EN Coin, a Blockchain Experience
Blockchain Implementation: EN Coin
Elena Barbour, Naryssa Fia
University of Hawaii at Manoa
ICS 455 Spring 2018
1 REQUIRED INSTALLS
Brew: xcode-select –install
Python: brew install python3
Nose: pip install nose
Venv: sudo python3 -m pip install virtualenv
Flask & Requests: sudo pip install Flask=0.12.2 requests==2.18.4
Crypto: sudo pip install crypto
Tornado: sudo pip install tornado
2 HOW TO RUN
Go to project directory in command line
Ensure above installs have been performed
Run Blockchain by running the following command line command: python blockchain.py
Run localhost client by running the following command line command: python blockchain_client.py
3 INTRODUCTION
With the recent popularity of cryptocurrencies, its various aspects are frequently discussed in the news, classroom, and social media. Courses within the ICS program frequently reference these aspects of cryptocurrencies in lecture. Being that this is a Security course, with some focus on encryption, developing a blockchain and experimenting with the crypto library in python. An interesting find while doing this project is that Python has a library function for SHA-3, also known as Keccak. Keccak served as a vital feature in our presentations on CryptoNote and CryptoNite, and was implemented in the hash used for our blockchain (seen in figure 3.1).
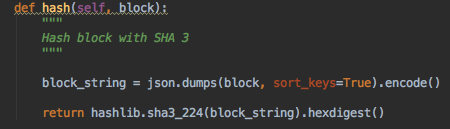 Figure 3.1 Python implementation of SHA-3
4 EXPLANATION OF FUNCTIONALITY
4.1 Blockchain code
Since the Blockchain is the basis to Bitcoin, or in our case EN coin, a lot of the operations will be done in the Blockchain class. Examples of these can be the adding nodes to the existing list of nodes, checking if a blockchain is valid so it can be added to the main blockchain, and resolving “conflicts”. Resolving conflicts is essential for honest blockchain creation since replace the nodes blockchain if there is a blockchain out being made that is longer. An example of resolving conflicts is through the consensus () function.
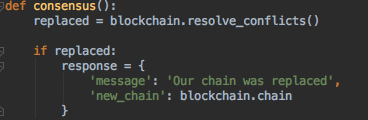 Figure 4.1.1 Python implementation of Consensus for blockchain
Which calls the resolve_conflicts () function, the resolve_conflicts () function will check with all it’s neighbor nodes and check if there are any nodes amongst its neighbors that have a blockchain longer than its own. If there is, then the longer blockchain will replace the shorter blockchain.
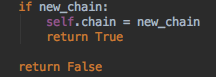 Figure 4.1.2 Inside the resolve_conflicts () function where the blockchain is replaced
Another example can be how the blockchain submits a transaction into the blockchain via the submit_transaction () function. This function will first make the transaction an array of the sender, receiver, and amount. Then reward the miner for mining the block and verifying the transaction. Now after the miner is rewarded, the money is transferred from one wallet to another.
 Figure 4.1.3 Transaction as an Array
How do we verify the signature? Since the blockchain is using SHA encryption, we’ll check the signature against the public key to see if it matches the sender’s address. If it does match, then the transaction is able to be submitted.
 Figure 4.1.4 verifying the transaction signature using a SHA1 verifier.
4.2 Blockchain Client A localhost client was implemented for this project. This is a combination of basic HTML, CSS, and Javascript. Figure 1.1 shows the Wallet generator in use. The Wallet Generator is an implementation of the wallet functions in the blockchain code. This provides the user with a graphical user interface to easily differentiate between the public and private keys. The public key also serves as the “address” for the sender and recipient.
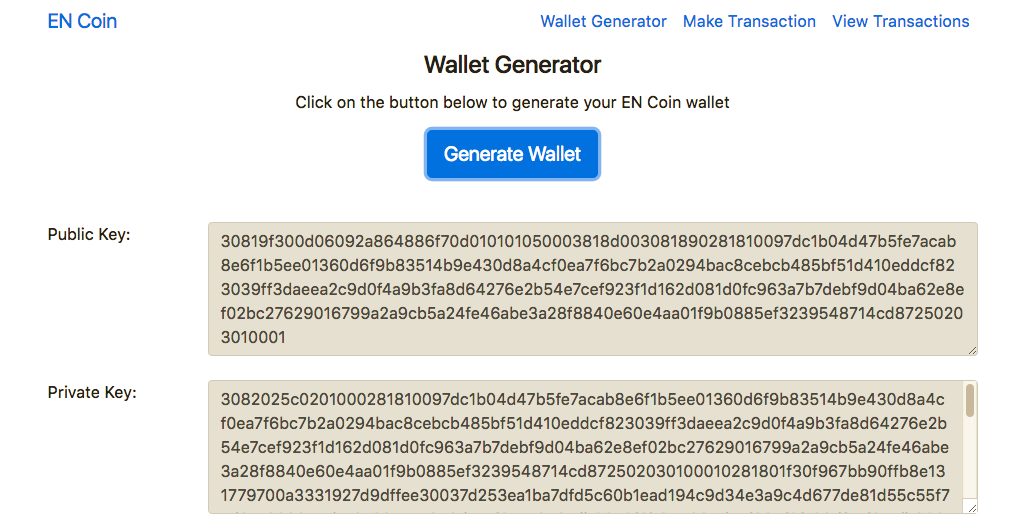 Figure 4.2.1 Wallet Generator on Localhost Client
Figure 4.4.2 displays the client interface for sending EN Coins. This page implements the new transaction, get transaction and verify transaction signature functions.
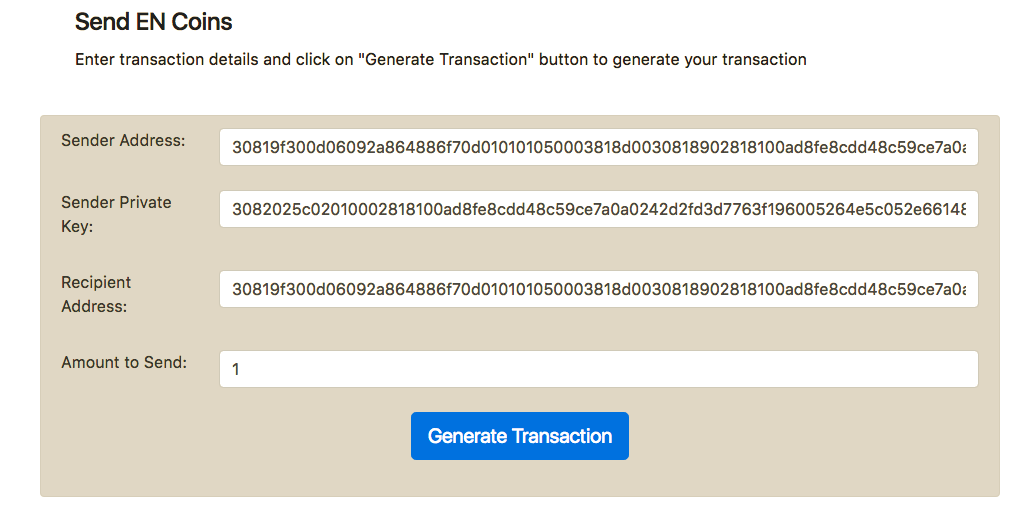 Figure 4.2.2 Send EN Coins
Once Generate Transaction is clicked, figure 4.2.3 is displayed. This is for the user to confirm the input is correct. After confirmed, the input goes through the verify transaction signature function. If there are any issues, the resolve conflicts function is utilized.
![]() Figure 4.2.3 Confirm Transaction
Figure 4.2.3 Confirm Transaction
5 PROCESS
For the development of the blockchain, Elena developed the Blockchain and Miner related functions (i.e. mine, create block, valid chain). Naryssa developed the Wallet and transaction related functions (i.e. new transactions, transaction verifier). The interface was also developed collaboratively. Naryssa developed the Wallet Generator, and Send EN Coins pages. Elena developed the Confirm Transaction and CSS for all pages.
6 CITATIONS
Build Your Own Blockchain: A Python Tutorial. (2017, August 30). Retrieved March 30, 2018, from http://ecomunsing.com/build-your-own-blockchain
Let’s Create Our Own Cryptocurrency. (2017, July 11). Retrieved March 30, 2018, from https://cranklin.wordpress.com/2017/07/11/lets-create-our-own-cryptocurrency/
Moujahid, A. (2018, March 14). A Practical Introduction to Blockchain with Python. Retrieved April 17, 2018, from http://adilmoujahid.com/posts/2018/03/intro-blockchain-bitcoin-python/
Van Flymen, D. (2017, September 24). Learn Blockchains by Building One – Hacker Noon. Retrieved March 29, 2018, from https://hackernoon.com/learn-blockchains-by-building-one-117428612f46
NOTE: This was a group project. Contributed Sections 1, 2, 3, 5, 6 in report. For code, contributed wallet and transaction functions.